The SimpleRSubDialog class is an easy way to add lesser used or advanced options to your GUI.
SimpleRSubDialog can be used in much the same way as SimpleRDialog. let us continue with the 'Factor Analysis' example. In the listeners page we saw how to add an option button to the dialog, which gave us the following code:
	#make dialog
	dialog <- new(SimpleRDialog)
	dialog$setSize(500L,400L)
	dialog$setTitle("Factor Analysis")

	#add variable selector
	variableSelector <- new(VariableSelectorWidget)
	variableSelector$setTitle("data")
	addComponent(dialog,variableSelector,10,400,850,10)

	#add a list for the variables
	variableList<- new(VariableListWidget,variableSelector)
	variableList$setTitle("variables")
	addComponent(dialog, variableList,100,900,450, 420)

	#Add an 'Options' button
	JButton <- J("javax.swing.JButton")
	button <- new(JButton,"Options")
	addComponent(dialog,button,500,800,600,600)
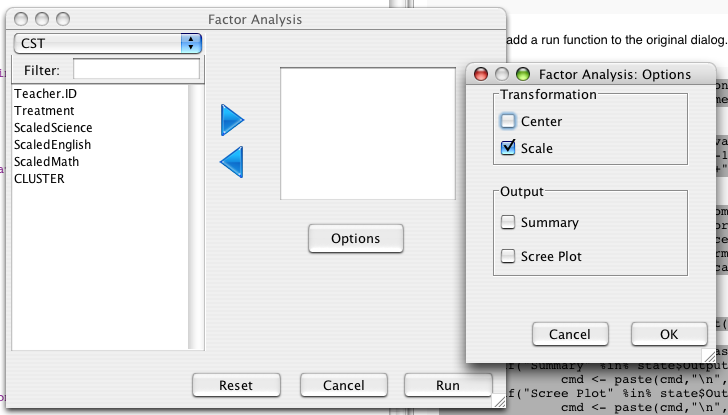
Now lets make a new SimpleRSubDialog and set dialog as it's owner (or parent). All sub-dialogs should be linked to another dialog, which can be an RDialog, SimpleRDialog, or another SimpleRSubDialog. When a widget is added to a SimpleRSubDialog, its owner will keep track of it, so that the widget states are remembered and handled correctly.
	#make Options Dialog
	subDialog <- new(SimpleRSubDialog,dialog,"Factor Analysis: Options")
	setSize(subDialog,250,300)
Now we can add some widgets to the dialog:
	#options for transforming the variables
	transBoxes <- new(CheckBoxesWidget,"Transformation",c("Center","Scale"))
	addComponent(subDialog, transBoxes,1,900,300, 100)
	transBoxes$setDefaultModel(c("Scale"))

	#output options
	outBoxes <- new(CheckBoxesWidget,"Output",c("Summary","Scree Plot"))
	addComponent(subDialog, outBoxes,350,900,700, 100)
Then we add an action listener to the options button to open the sub-dialog when it is pressed:
	#Listen for the button to be pressed
	ActionListener <- J("org.rosuda.deducer.widgets.event.RActionListener")
	actionFunction <- function(cmd,ActionEvent){
		subDialog$setLocationRelativeTo(button)
		subDialog$run()
	}
	listener <- new(ActionListener)
	listener$setFunction(toJava(actionFunction))
	button$addActionListener(listener)
finally we can add a run function to the original dialog.
.factorAnalysisRunFunction <- function(state){
	#print(state) #a print statement is useful for debugging

	#make formula
	form <-paste( " ~ " , state$variables[1])
	for( var in state$variables[-1])
		form <- paste(form,"+",var)

	#make prcomp call
	cmd <- paste("pr.model <-prcomp(", form, ",", state$data)
	if("Center" %in%state$Transformation)
		cmd <- paste(cmd,", center=TRUE")
	if("Scale" %in%state$Transformation)
		cmd <- paste(cmd,",scale=TRUE")
	cmd <- paste(cmd,")")

	#always print model
	cmd <- paste (cmd,"\n","print(pr.model)")

	#output summary and plot if asked for
	if("Summary" %in% state$Output)
		cmd <- paste(cmd,"\n","summary(pr.model)")
	if("Scree Plot" %in% state$Output)
		cmd <- paste(cmd,"\n","screeplot(pr.model)")

	#execute command as if typed into console
	execute(cmd)
}
dialog$setRunFunction(toJava(.factorAnalysisRunFunction))
Notice that the state of the 'Transformation' and 'Output' widgets are passed to the 'state' parameter. The final result looks as follows:
 Deducer: A GUI for R